Seperti yang sudah kita ketahui, bahwa co.cc adalah top level domain yang kita boleh dapatkan secara percuma. Kita boleh mengantikan nama blog kita dari "http://namadomain.blogspot.com" atau "http"//namadomain.wordpress.com" (dll) menjadi "http://namadomain.co.cc" . Dengan co.cc kita boleh control DNS Records, A, MX, dan CNAME records, sehinga domain co.cc bukan hanya sekadar "URL Forwarding".
Well, let’s get our point, below is how to set up or change blogspot domain with Co.CC:
If you are interested in changing your blogspot domain with Co.CC domain, happy trying and good luck.
Well, let’s get our point, below is how to set up or change blogspot domain with Co.CC:
- Click here if you have not yet had your Co.CC domain. Please register first(click here) if you haven’t has your own account.
- After you have your account, please sign in to www.co.cc with your account.

- Click the Getting A New Domain tab (with assumption that you haven’t had your domain name).

- Type the domain name you want, click the Check availability button to check the availability of your domain name, repeat if unavailable.
-
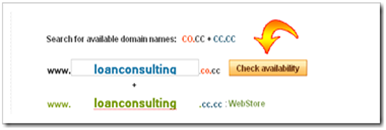
- If the domain name is available, click Continue to registration button as the screenshot below

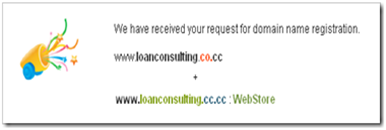
- Congratulations, you now have your own domain name of Co.CC. To be noted, you haven’t managed the setting to your new domain.
- As usual, you sign in first with your account, then click Domain Settings as you see at the screenshot below
-

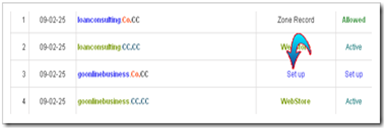
- Click Set up at your new domain name as seen at the screenshot below, then it will appear the words Please domain setup now as the notification that your new domain name of Co.CC has not been set up.
-
- Click the words Please domain setup now to set up your new domain name of Co.CC. On this page, you will choose one of the three domain setup as Manage DNS, Zone Record, and URL Forwarding. For those who want to change the blogspot domain name with Co.CC, you should choose the Zone Record by click it or its radio button.
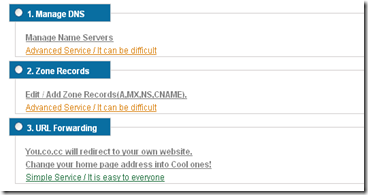
- After you choose Zone Record, there will appear the setting option as the screenshot below
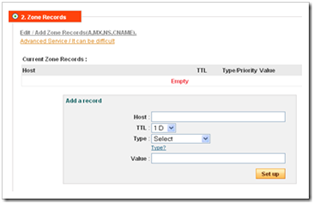
- At the dialogue box, fill the Host with your domain name of Co.CC, e.g. www.loanconsulting.Co.CC (the Host name of my Co.CC domain). Then at TTL let it as 1D, for Type, choose CNAME, and Value fill with ghs.google.com. After all fields are filled out, click the Set up button. You can see the example of my setting as the screenshot below
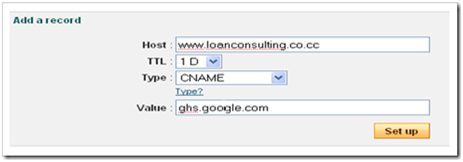
- Now you finish setting your new Co.CC domain, but usually you have to wait for about 48 hours until your new domain is active.
- Log in to blogger with your account.
- Click Settings at the dashboard
-
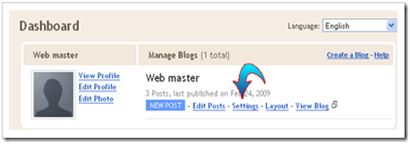
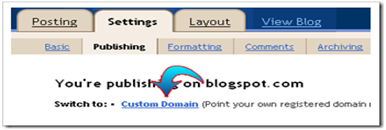
- At the Settings page, click Publishing
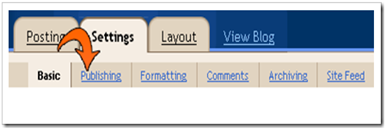
- When you are at the Publishing page, click Custom Domain
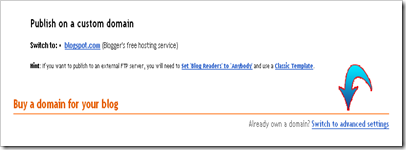
- At the page of Publishing on custom domain, you are not asked to buy the domain (except you want it), but we will use the blogspot domain that we have made, then click Switch to advanced settings to change your blogspot domain with Co.CC domain.
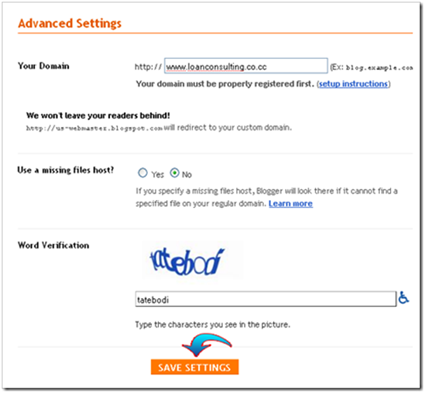
- At the page of Advanced Settings fill with your Co.CC domain at the field of Your Domain e.g. www.loanconsulting.Co.CC (it’s my Co.CC domain). The for Use a missing files host? Leave it as No and at the field of Word Verification fill with the words that appear with blur (colored and unclear). After all fields are filled out, click Save Settings.
- Be sure that Save Setting at Point 6 is successful with the sign as the words Settings Were Saved Successfully at upper right of the page
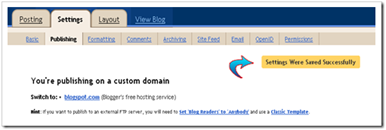
- You have finished changing your blogspot domain with Co.CC domain.
If you are interested in changing your blogspot domain with Co.CC domain, happy trying and good luck.
Jadi kesimpulannya adalah:
- * Jika anda memakai layanan blogger/blogspot maka gunakanlah "Zone Records"
- * Jika domainnya digunakan untuk web yg memerlukan hosting atau untuk wordpress maka gunakanlah "Manage DNS"
- * Jangan menggunakan "URL forwarding" jika tidak terpaksa.Seperti untuk blog dari multiply yang tidak support custom domain.


0 comments:
Post a Comment